Tips:
- Use the below setup guides & templates as a layer below your artwork in Adobe Illustrator. Scale them bigger or smaller if needed.
- Keep all artwork contents within the safety margin "green line"
- Extend artwork's background all the way to the bleed line "blue line" or the edge.
- Feel free to rotate the templates between horizontal and veritcal orientations as you see fit. I.e Size 12 x 24 is the same as 24 x 12 .
For double-sided or multiple-page work, all pages must be submitted in one PDF file. With page 1=front, page 2=back, etc
| PRINT FILE PREPARATION | INSTRUCTIONS | GUIDES |
How to setup artwork files properly for printing jobs?
Download our PDF templates below. they were designed to help you setup your design files properly.
Our templates serve as a strong guide and we highly recommend that you use them for your design.
Please open the templates with your design software and adjust the sizing as you fit.
How to ensure that your file is print ready?
Step 1) Ensure the file matches the product's required dimensions. Ensure that the artwork is created in CMYK 300 dpi with 1/8 inch or 0.125” bleed on all sides.
Step 2) Make sure that all images are embedded, and that all the text is outlined. Select all objects in your Adobe Illustrator file in all pages. Hit Ctrl-Shift-O (PC) or Command-Shift-O (Mac).
Step 3) Export all files into PDF format with bleeds (not bleed lines but bleed space).
How to setup your files for a printing job?
•Download our setup guides and templates for optimal results. BE SURE TO DELETE all guidelines upon completion.
•DELETE any hidden layers that are not intended to print (ie: setup guide lines, layers or other hidden artwork layers)
•Each File or artwork submitted must be submitted as a single PDF file. Ensure that all pages are the same size.
•All files must be setup with proper orientation to ensure proper back up. Follow Our Orientation Guides.
•Try to avoid using borders in your design. If a border is too close to the trim, the trim may be slightly off center.
•1/8" or 0.125” bleed and all-important art and text must be within the safety margin.
• Ensure your files are high resolution and that all images are CMYK 300 DPI.
•Black designs should have the CMYK values: values: C0, M0, Y0, K100
•Embed all images and outline all fonts. Select all objects in your file in all pages. Hit Ctrl-Shift-O (PC) or Command-Shift-O (Mac).
•Submit CMYK files only for best color results.
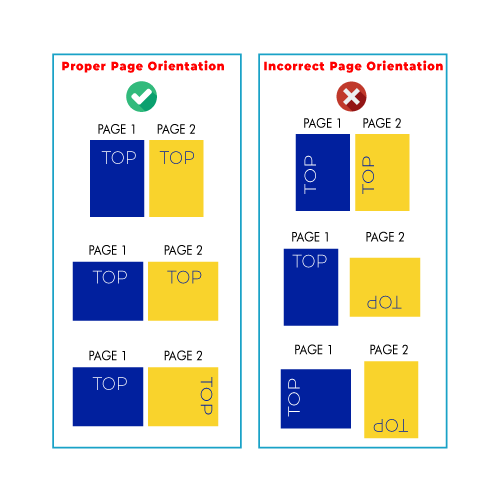
How to setup artwork page orientation for Flat print materials?
Flat print material such as business cards, post cards, posters, flyers, etc.
Page 2 referes to the other side:
Page 1 = Front
Page 2= Back
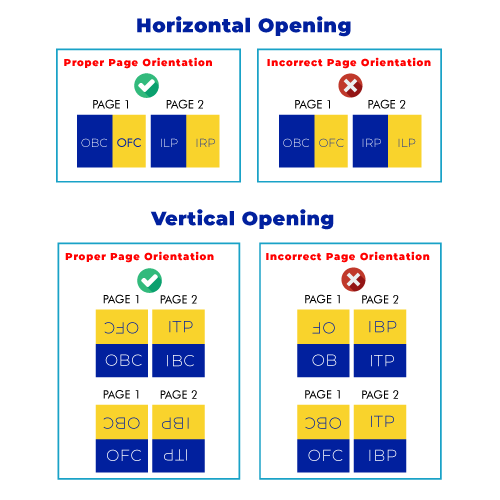
How to setup artwork page orientation for Folded print materials?
Folded print material such as folded business cards, greeting cards, brochures, etc.
Image Abbreviations Legend:
VERTICLE:
OFC - Outside Front Cover
OBC - Outside Back Cover
ITP - Inside Top Panel
IBP - Inside Bottom Panel (a.k.a Inside Cover)
HORIZONTAL:
OFC - Outside Front Cover
OBC - Outside back cover
ILP - Inside Left Panel (a.k.a Inside Front Cover) IRP - Inside Right Panel (a.k.a Inside Back Cover)
What are some of the best practices used to design print material?
1) Establish the required information and ensure accurate copywriting.
2) Determine who the print material is targeted at.
3) Use a unique voice and style your message across.
4) Always opt for layouts that are easy to read, attractive and simple.
5) Use no more than 4 colors and stay consistent with a selection of 1-3 fonts.
| banners |
Also follow [FLAT] Page Orientation Guide
RETRACTABLE PULL-UP BANNERS:
HANG BANNERS:
| BOOKLETS | CATALOGS |
Also follow [FLAT] Page Orientation Guide
| BOOKMARKS | TEAR CARDS | TICKETS|
Also follow [FLAT] Page Orientation Guide
BOOKMARKS:
TEAR CARDS:
TICKETS:
| With Perforation | Without Perforation |
|---|---|
| 4" x 2" | 4" x 2" |
| 5.5" x 2" | 5.5" x 2" |
| 6" x 3.5" | 6" x 3.5" |
| 8.5" x 3.5" | 8.5" x 3.5" |
| BROCHURES |
Also follow [FOLDED] Page Orientation Guide
| BUSINESS CARDS |
Also follow [FLAT] Page Orientation Guide
Also follow [FOLDED] Page Orientation Guide
| DECALS | STICKERS |
Also follow [FLAT] Page Orientation Guide
| DOOR HANGER TAGS | TENT CARDS
Also follow [FLAT] Page Orientation Guide
DOOR HANGER TAGS:
TENT CARDS:
| FLYERS | MINI POSTERS |
Also follow [FLAT] Page Orientation Guide
| MAGNETS |
Also follow [FLAT] Page Orientation Guide
CAR MAGNETS:
REGULAR FLAT MAGNETS:
DIE-CUT-TO-SHAPE MAGNETS:
| Oval Shape | Rectangle Shape |
|---|---|
| 2.5" x 3.5" | 2.5" x 3.5" |
| 3.5" x 2" | 3.5" x 2" |
| 3.5" x 8.5" | 3.5" x 8.5" |
| 3" x 4" | 3" x 4" |
| 4" x 6" | 4" x 6" |
| 4" x 7" | 4" x 7" |
| 4" x 8" | 4" x 8" |
| 4" x 9" | 4" x 9" |
| 4" x 11" | 4" x 11" |
| 5" x 7" | 5" x 7" |
| 5.5" x 8.5" | 5.5" x 8.5" |
| 6" x 8" | 6" x 8" |
| Circle Shape | Square Shape |
|---|---|
| 2" x 2" | 2" x 2" |
| 2.5" x 2.5" | 2.5" x 2.5" |
| 3" x 3" | 3" x 3" |
| 3.5" x 3.5" | 3.5" x 3.5" |
| 4" x 4" | 4" x 4" |
| 4.5" x 4.5" | 4.5" x 4.5" |
| 5" x 5" | 5" x 5" |
| POSTCARDS | GREETING CARDS
Also follow [FLAT] Page Orientation Guide for Post Cards
Also follow [FOLDED] Page Orientation Guide for Greeting Cards
POST CARDS:
GREETING CARDS:
| Vertical | Horizontal |
|---|---|
| 5.5" x 8.5" | 8.5" x 5.5" |
| 7" x 10" | 10" x 7" |
| 8.5" x 11" | 11" x 8.5" |
| SIGNS | CANVAS | BOARDS |
Also follow [FLAT] Page Orientation Guide
A-FRAME SANDWICH BOARDS:
| STATIONERY | TABLE CLOTH THROWS |
Also follow [FLAT] Page Orientation Guide
Also follow [FOLDED] Page Orientation Guide for Presentation Folders
LETTERHEADS:
PRESENTATION FOLDERS:
NOTEPADS:
NCR FORMS:
ENVELOPES:
TABLE THROWS & COVERS:
Please Visit This Page From A Desktop or a Tablet
Orders may experience delays due to additional measures taken to minimize the spread of the Omicron variant as well as industry supply chain uncertainties and heavy pressure on the shipping networks of Canada Post, DHL, FedEx, & UPS. All delivery dates are estimates & are in noway a guarantee. Please place your orders well in advance & anticipate delays.
Please note that due to the pandemic, we have
closed our office in Burnaby, BC permanently
and have ceased all office operations. We have adapted to a remote work business module and transitioned into a full e-commerce operation. We also no longer offer local pickup and are offering free shipping on the bulk majority of orders. Thank you for your continued support and we look forward to serving you more.
An agency worth its salt. Here to flip your Marketing 360°
Experts in promoting Businesses, Brands, Products, and Services through the effective use of Promotional Products, Print Material, & Marketing Solutions.
Toll-Free +1 (833) 360-7766
info@360promo.ca
Monday - Saturday: 9am - 6pm PST
Legal Policies
Corporate
Information Center
-
![free website LIFETIME DEAL BY 360PROMO]() Button
ButtonOn time, any time.
$500

Mailing Address | 670-4974 Kingsway Avenue, Burnaby, BC V5H 4M9
© 2013-2022 All Rights Reserved
|
360promo.ca
|
A Feddonia Enterprises Inc. Subsidiary